

 Chuck Lee

FAQ\Hybrid INV
Issue introduction
The inverter doesn't work, the LED screen keeps showing waiting... status.

Confirmation of basic information
[Photo] SN number of the inverter
Confirm the DC Switch is turn on.
Guidance for installer
Step1: Measuring the voltage on the PV side with a multimeter, ensure the red probe is connected to the positive terminal and the black probe to the negative terminal. The correct measurement should be a positive number within the MPPT range. If a negative number appears, it indicates that the PV wires are reversed. If the voltage is too low, wait for sufficient solar energy to start the device.

Measure the PV terminal voltage
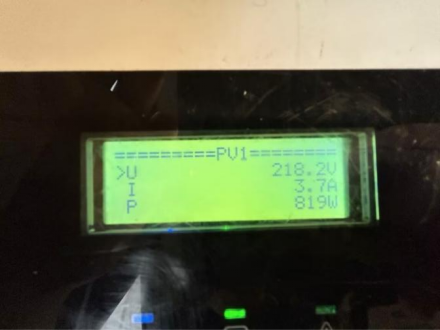
Step2: After measuring the voltage on the PV side, check the voltage of the PV on the screen of the inverter to see if it matches the measured voltage.
Setting Path: System Status➡️ PV1/PV2
Step3:Ensure that the PV terminals are sourced from the SolaX accessory kit.

Step4:
Use a multimeter to measure the voltage at the inverter's AC port. In a three-phase system, measure the line voltage.
|
|
|
|
Phase voltage on the grid side |
Line voltage(line voltage=√3×Phase voltage) |


Step5:Upgrade the firmware version to the latest.
Step6: Only connect the PV, disconnect the AC switch, and check if the inverter screen lights up.
Tips: For X3-hybrid G4,check the COM connector to ensure that PIN3&6 is not short-circuited. Then check the Shutdown connector to ensure that PIN4&6 is not short-circuited.
Information check list
If you have completed the above <Guidance for installer>, and the problem is still not solved, please collect the following troubleshooting information and send them to the Solax technical support team.
1.[Photo] SN number of the inverter

- [Photo] PV terminal.Clearly display the terminal silk screen as shown in the diagram below.
|
The photo must clearly show the terminal silk screen. |
|
|
|
|

3.[Photo]The PV string voltage.
4.[Photo]Phase voltage measurement result, L1&N, L2&N, L3&N.
5.[Photo]Line voltage measurement result, L1&L2, L2&L3, L1&L3.
6.<Video>Only connect the PV, disconnect the AC switch, inverter screen state.