SolaXCloud App Operation Manual
Only for home user V6.3.0
*This manual is based on SolaXCloud App V6.3. The finally displayed pages should be subject to the actual situations.
About This App
SolaxCloud APP supports iOS and Android operation system. It allows you to master your family energy devices easily.
You can also access the website www.solaxcloud.com through a PC, to manage your family energy plant.
Account & Security
Account Creation
At the login page, tap Sign up, to create an account. Select a country or region, select the role of End User, complete sign-up information, and finally tap Sign up.

Login
Select your server, enter your account and password, tick to agree on Privacy Policy and Terms of Use, and finally tap Log in.

Note: If you consecutively enter the incorrect password Five times, the account will be forcibly locked for half an hour.
Forgot Password
If forgetting the password, you can tap Forgot password, to re-set the password. Password
resetting requires you to enter the verification code sent to your registered email, to authenticate your identity.

Plant
Adding Plant
Step 1: Tap the icon “+” in the middle of the homepage, to add a plant (for users who add a plant for the first time).
Tap the icon “+” at the upper right corner of the homepage, to select Add plant from the drop-down menu (for users who have already added a plant).


Step 2: Tap Skip or Go to Add if you have learned about the setup when the setup pages (4 pages in total) pop up.

Step 3: Select WHI LE USING THE APP or ALLOW THIS TIME ONLY when the SolaXCloud App asks for your permission to obtain your location information.

Step 4: Fill in the basic information about the plant, including plant name, system capacity
(setting range 0-99999999), country/region, timezone, and location. Select whether to enable Show first by default and Use&Set DST, and determine whether to authorize the setting and maintenance right to an installer or agent. Then tap Next.

At this time, you have already created a virtual plant. At the plant list, you can view the plant. If you want to continue the subsequent operations (adding device and network configuration), refer to Network Configuration.
Plant Management
Multiple plants may exist in an account. For convenience of management, you can go to Me > Plant Management, to view the plant list, search for a plant, or add a plant:

Single-plant Management
Selecting a plant from the plant list, you can view its details, including basic information about plant, service information and right.
Besides, you can also tap "..." at the upper right corner of the detail page, to perform these operations on a plant: edit plant, delete plant, set a default plant, and set the tariff.

You can edit the plant basic information and modify the permissions.

A user can delete a plant which has not been bound with a physical device. When deleting a plant, you need to enter a verification code.

Tap “Set default”, to set the current plant as the default plant. After setting it as the default plant, the data displayed at the homepage is just data of the default plant for each login.
You can set the tariff for a plant. For details, see Setting Tariff.
Setting Tariff
Tap “Setting”, to go the tariff setting page. Tap the editing icon  , to set the selling/buying (To grid/From grid) tariff.

Setting Selling Tariff
1. Select the currency unit according to the actual situations.
2. Select “To grid” from the tab.
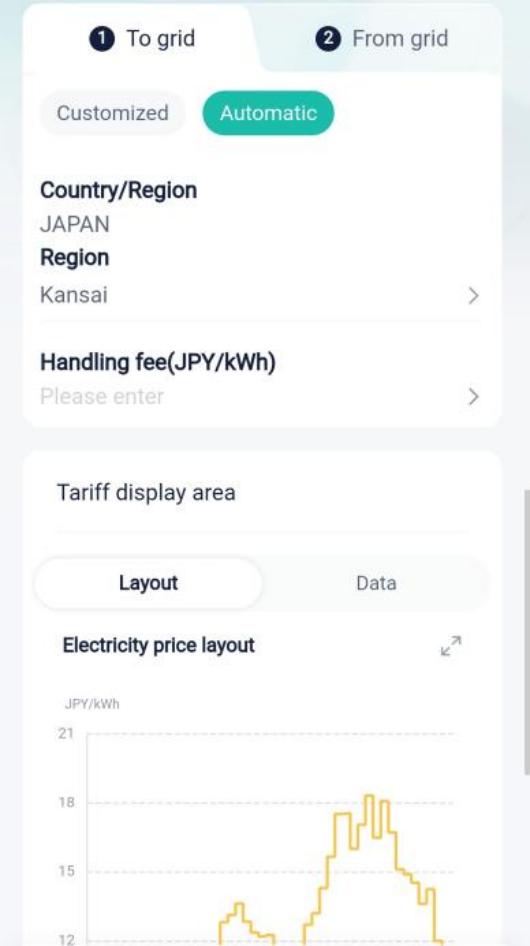
3. Adopt a tariff setting method. There are two methods: Customized and Automatic (hidden in region/country not supporting the service).
Fixed tariff: Select Fixed tariff, set the price, and then tap Save.

TOU tariff:
1. According to your actual situations, tap the blank of end date, to divide a year into different periods.
2. Tap “>” or “Add tariff” to enter a period.
3. Divide a day (24h) into different time slots.
4. Set an electricity price for each time slot.
5. After all settings are done, tap Save.

 TOU tariff (weekdays+weekends): Similar to settings of TOU tariff, but it further provides weekday and weekend settings for a daily cycle.

- Automatic: You need to set the country/region and handling fee (confirmed by the local grid).
Setting Buying Tariff
The method for setting the buying tariff is similar to that for setting the selling tariff, which is not described herein. For details, see Setting Selling Price.
Network Configuration
SolaX devices, such as Dongle Pocket, Datahub, Adapter-box, EVC, and X1- Micro, all can connect to the SolaxCloud. Here only take Dongle Pocket (used for communication of an inverter) as an example, to describe the network
configuration process. Configuring steps for the other devices are similar to those for Dongle Pocket, which are not described in detail herein.
Dongle Pocket can achieve networking through Wi-Fi, 4G, and LAN. You can adopt one of them to complete networking according to the type of pocket
(including Pocket Wi-Fi, Pocket 4G, Pocket LAN, Pocket Wi-Fi+4G, and Pocket Wi-Fi+LAN) you purchased.
Wi-Fi
Prerequisites
l The phone WLAN has been switched on and there is Wi-Fi available with a good signal strength.
l Has installed the Pocket with Wi-Fi function and connected it to the device properly according to Pocket Wi-Fi Installation Manual, Pocket Wi-Fi+4G Installation Manual, and Pocket Wi-Fi+LAN Installation Manual.
l The device has been powered on and is close to the router and phone.
Steps
Step 1: At the login page, select “More > Network Configuration” .
Or tap the “+” icon at the upper right corner of the homepage, to select “Add Device” from the drop-down menu.


Step 2: Select the correct device type from the pictures below according to the device you have.

Step 3: Tap Scan to scan the Pocket QR code or manually enter the Pocket registration number. After the registration number is identified successfully, tap Next.

Step 4: Configure the network.
1. Select Wi-Fi as the communication mode (only for Pocket Wi- Fi+4G. Pocket Wi-Fi and Pocket Wi-Fi+LAN not required).
2. Select an available Wi-Fi and enter the password.
3. Select the IP configuration manner.
u If selecting the DHCP, there is no other additional configuration.
u If selecting the static IP, you need to enter the network parameters manually, including IP address, subnet mask, gateway, and possible DNS server address.
4. Tap Next.

Note: Users whose phone brand is NOT vivo, HUAWEI, and OPPO can directly skip from this step to Step 6.
Step 5: Tap Connect, and switch the phone WLAN to the device hotspot. The hotspot name is: Wifi_device SN. After that, return to the SolaXCloud App.

Step 6: When the system enters the following page, wait until the device connects to the site and SolaXCloud. When all items are  it indicates that the device connects to the SolaXCloud successfully. Tap Finish.

Note: If the device failed in networking , find the corresponding solution according to the error code.
Step 7: Tap Go Check, to ensure that the phone WLAN has been switched to the family Wi-Fi. After switchover, return to this App and tap Got it.

After the device has been connected to the cloud for 5 minutes, you can check the result of connection. Generally, there are two status for a device:
 indicates that the network configuration succeeded and the device is connected to the SolaXCloud.
 indicates that the device has been bound with the plant, but the network has not been configured successfully or the device data has not been uploaded to the cloud. You may wait for a while to refresh or go to reconfigure the network. For the method for re- configuring the network, please refer to Step 2 to Step 7.
In addition, if you exit from device adding accidentally or want to add another device to the already existing site, you can start from the following entrances:
Entrance 1: “+” at the upper right corner of the homepage → Add Device
Entrance 2: Device at the navigation bar → “+” at the upper right corner → Add Device For the other steps, refer to Step 2 to Step 7.
4G
Prerequisites
l Prepare a 4G IoT card (support NB-IoT or Cat-M). Pocket Wi-Fi+4G users need to acquire the APN of the card from an operator.
l Has connected the Pocket with the 4G function to the device according to Pocket 4G Installation Manual or Pocket Wi-Fi+4G Installation Manual.
l The phone WLAN has been switched on and there is available Wi-Fi nearby with a good signal strength.
l The device has been turned on and is in the range of the 4G signal.
Steps
As there are differences between Pocket 4G and Pocket Wi-Fi+4G in
networking, you need to select the corresponding operation guide according to the type of Pocket.
For Pocket 4G
Step 1: Tap the “+” icon at the upper right corner of the homepage, to select “Add Device” from the drop-down menu.
Step 2: Select the correct device type from the pictures below according to the device you have.
Step 3: Tap Scan to scan the Pocket QR code or manually enter the Pocket registration number. After the registration number is identified successfully, tap Next.

Step 4: Tap Finish when this page appears. When a device is bound with a site, it indicates that the device can connect to the SolaXCloud.

After the device is bound with the site, you can check whether the device has been connected to the SolaXCloud.
 indicates that the device is connected to the SolaXCloud successfully.
In addition, if you exit from device adding accidentally or want to add another device to the already existing site, you can select Add Device from the drop-down menu by tapping “+” at the upper right corner of the homepage.
For Pocket Wi-Fi+4G (selecting 4G) Steps
Step 1: At the login page, select “More > Network Configuration” .
Or tap the “+” icon at the upper right corner of the homepage, to select “Add Device” from the drop-down menu.
Step 2: Select the correct device type from the pictures below according to the device you have.
Step 3: Tap Scan to scan the Pocket QR code or manually enter the Pocket registration number. After the registration number is identified successfully, tap Next.

Step 4: Select 4G as the communication method. Enter the APN. Select the network deployment. Tap Next.

Note: Users whose phone brand is NOT vivo, HUAWEI, and OPPO can directly skip from this step to Step 6.
Step 5: Tap Connect, and switch the phone WLAN to the device hotspot. The hotspot name is: Wifi_device SN. After that, return to the SolaXCloud App.

Step 6: When the system enters the following page, wait until the device connects to the site and SolaXCloud.
When all items are , it indicates that the device connects to the SolaXCloud successfully. Tap Finish.
Note: If the device failed in networking , find the corresponding solution according to the error code.
Step 7: Tap Go Check, to ensure that the phone WLAN has been switched to the family Wi-Fi. After switchover, return to this App and tap Got it.
After the device has been connected to the cloud for 5 minutes, you can check the result of connection. Generally, there are two status for a device:
 indicates that the network configuration succeeded and the device is connected to the SolaXCloud.
indicates that the device has been bound with the plant, but the network has not been configured successfully or the device data has not been uploaded to the cloud. You may wait for a while to refresh or go to reconfigure the network. For the method for re- configuring the network, please refer to Step 2 to Step 7.
LAN
Prerequisites
- The phone WLAN has been switched on and there is Wi-Fi available with a good signal strength.
- Has installed the Pocket with the LAN function and connected it to the device properly according to Pocket LAN Installation Manual or Pocket Wi- Fi + LAN Installation Manual.
- The device has been powered on.
Steps
Step 1: Tap the “+” icon at the upper right corner of the homepage, to select “Add Device” from the drop-down menu.

Step 2: Select the correct device type from the pictures below according to the device you have.
Step 3: Tap Scan to scan the Pocket QR code or manually enter the Pocket registration number. After the registration number is identified successfully, tap Next.

Step 4: Tap Finish when this page appears. When a device is bound with a site, it indicates that the device can connect to the SolaXCloud.
After the device is bound with the site, you can check whether the device has been connected to the SolaXCloud. indicates that the device is connected to the SolaXCloud successfully.
In addition, if you exit from device adding accidentally or want to add another device to the already existing site, you can select Add Device from the drop-down menu by tapping “+” at the upper right corner of the homepage.
Homepage Introduction
The page on the left side is homepage, which displays the overall running situations of a plant. The table on the right side introduces composition and functions of this page.

Device
Device-related Operations
At the navigation bar, select Device to go to the device list page. By switching the device at the upper left corner, you can view all devices under a site. Tap a device, and you can view details of the device. For details about it, please see Device Details.

Besides, you can execute the following operations on a device:
- Remote settings: Tap to enter a single device, and you can set the device remotely. Please set it under guidance of an installer or agent, or it may lead to device abnormality or failure.
- Add device: Tap “+” at the upper right corner of the page, to add a device.
- Unbind device: Tap to enter a single device, to unbind a device from a plant.
Device Details
Here take the inverter X3-hybrid-G4 as an example, to show composition of a device detail page. Device pages vary with device types. The device detail page is subject to the actual situations.

Intelligent (TOU)
TOU (Time of Use) is a mode in which you can set different electricity prices and usage strategies for different time periods. By setting the charge/discharge time periods, the battery can be charged in lower electricity price periods, and discharge in higher electricity price periods, to save electricity costs.
Select Device>Intelligent to set the TOU mode. It should be noted that the sub menu
Intelligent is visible only when a device in the current site supports the TOU function and the device is online.
Step 1: Tap Create TOU.
Step 2: Add the basic information for TOU, including selecting TOU name; selecting a device to be controlled (optional); selecting the period type; selecting the cycle type (if you select Customized as period type); and setting the min battery SOC.
- If selecting Import period, you can directly invoke the period you have created before. For the TOU tariff setting method, refer to Setting Tariff. Non-TOU tariff (referring to fixed tariff and custom auto tariff here) cannot be imported.
- If selecting Customize, you need to divide periods yourself.
Step 3: Set the work mode to cycle according to the period type. A user can divide one year into different periods, and set work modes for daily cycle in each period. One day can be divided up to 10 time slots and supports 5 work modes at most.
As you have created the period and tariff during tariff setting, after importing the period, you only need to complete the following steps:
1. Tap “>” on the upper right corner of each period, to enter the period to edit it.
2. Tap the column of work mode, to enter the work mode page.
3. Set work mode and corresponding parameters (if any) for each time slot. After setting, tap Save.
4. After setting work modes for each period, tap Save.

1. Tap the column of start date, to divide one year into different time periods.
2. Tap Add content to enter each period.
3. Tap the column of end time, to divide one day (24h) into different time slots. Two neighboring time slots cannot be overlapped with and separated from each other.
4. Set work modes for each time slot. After setting, tap Save.
5. After setting work modes for each period, tap Save.

Step 4: Return to the Create TOU page and tap Save , to complete creation of TOU mode. You can apply this TOU mode to devices that support TOU.
Service
Warranty Management
In the Warranty Management module, users can view the list of warranties under the current account. The warranty list shows all devices for which the warranty has been claimed. In addition, you can also filter and edit a warranty.

Third-party Ecology
Through the API service, users can access the SolaXCloud to obtain real-time data, historical data and alarm messages of authorized inverters.
Email Subscription
Through subscription function, you can get the latest running data of the device and keep track of the situations of the device at any time.

Help Center
In the Help Center, you can:
- watch learning videos to quickly grasp the essentials of network configuration.
- view the App instructions to learn how to use the App in an all-round way.
- feed your problems or suggestions back to us in the application of the App.
- view the contact information of the installer or agent for timely assistance.

EV Charger
Tapping EV Charger to enter the EV Charger Card Management page, you can:
- view all EV charge cards under the selected plant.
- add an EV charge card.
- delete an EV charge card.
Viewing EV charge cards
Select a plant, and the red area is all EV charger cards under the plant.

Adding EV charge card
1. Select the plant to which you want to add the card (the EV charger has been bound to the plant, and successfully connected to the cloud).
2. Tap Add and select a method to add.
 Scan the barcode: The barcode on the EV charger card.
Enter the card number: The card number of the EV charger card.
Bind through the EV charger: Put the card close to the swipe board of the EV Charger. When you hear the sound of "deeeee---", it means swiping the card succeeds.

Deleting EV charge card
Select the EV charger card to be deleted from all the EV charger cards under the plant. Long press the card, and then Delete will appear. Tap Delete to complete it.

Local Mode
In local mode, users can view device local data and alarm messages, and switch communication methods without a network.
There are two entrances to accessing the local mode :
- On the login page, select More>Local Mode.
- On the homepage, select Services>Applications>Local Access.
Login
1. Tap the  icon to scan the Pocket QR code or manually enter the Pocket registration number. After the registration number is identified successfully, enter the local password (optional. If the end user has set the local password) and tap Login.

2. Tap Connect when the following window pops up.

Dongle
When using a Dongle Pocket Wi-Fi+4G as the communication device, you can switch between Wi-Fi and 4G by configuring the corresponding network in local mode.
Wi-Fi Network Configuration
Step 1: Select Dongle at the bottom bar, to go to the Dongle page. At the Dongle page, tap  at the upper right corner to go to the network configuration page.

Step 2: At the network configuration page, configure the following items:
(1) Select Wi-Fi as the communication mode.
(2) Tap the Find AP button to select an available network from the AP list.
(3) Enter the network password.
(4) Select whether to switch off DHCP. If DHCP is switched off, you need to provide detailed information about the network.
(5) Tap Next.

Step 3: Wait for several minutes until all indicators (shown in red box) are lit up, which indicates that device Wi-Fi network configuration is successful. Tap OK.

4G Network Configuration
Step 1: Select Dongle at the bottom bar, to go to the Dongle page. At the Dongle page, tap  at the upper right corner to go to the network configuration page.

Step 2: At the network configuration page, configure the following items:
(1) Select 4G as the communication method.
(2) Select Manual configuration as the configuration mode.
(3) Enter the APN.
(4) Enter the network deployment.
(5) Tap Save.

Step 3: Wait for several minutes until all indicators (shown in red box) are lit up, which indicates that 4G network configuration is successful. Tap OK.

Note: Do not leave any page during networking. Otherwise, the network configuration will exit and fail.
Personal Settings
Select Me at the navigation bar, to go to my personal information page. You can modify personal information, manage a plant, view messages and notifications, and perform personal settings.
- Basic information: Tapping the basic information card, you can modify the user name, email, country/region, phone, and password. You can also delete the current account(consider carefully).
- Plant management: You can view the plant list; add, delete, or edit a plant; set a default; and set tariff.
- Message center: You can view all messages and notifications.
- Settings: Set the language, temperature unit, and holidays for your preference.


 Chuck Lee
